Taking Control of Back Pain (Full Guide)

Why Back Pain Happens (and Why Tension Is the Root Cause)
Back pain doesn’t come out of nowhere. It builds slowly, fueled by daily habits and underlying conditions that keep your body locked in tension. Hours of sitting weaken your core and stiffen your hips. Stress and poor sleep push muscles into constant tightness. Over time, your back becomes overworked carrying loads it was never meant to.
But lifestyle isn’t the only culprit. Medical conditions like arthritis, herniated discs, scoliosis, spinal stenosis, and old injuries can all trigger protective muscle guarding. The body senses pain and instability, so it clamps down. That tension often sticks around, leaving you stiff and sore every day.
Most people try to fix back pain in the wrong order -- stretching or strengthening while their muscles are still locked up in pain. That’s why results don’t last. The real solution is a three-step process: release tension, restore mobility, then build strength. In this article I will detail a three-step routine that anyone can implement to relieve their pain short and long term.
Step 1: EMS for Back Pain Relief – The Foundation
Goal: Relieve pain, release muscle tension, and prepare your body for real recovery.
Why EMS is essential
EMS (electrical muscle stimulation) is the foundation because it tackles the single biggest roadblock: pain-driven muscle tension. With gentle electrical pulses, EMS provides deep tissue stimulation. This stimulation serves to fatigue stubborn spasms which relaxes muscles that won’t release on their own.
Whether your tension comes from hours of sitting, chronic stress, or conditions like arthritis or disc problems, EMS provides the reset your body needs. Once pain drops, stretching becomes productive and strengthening becomes safe. Without EMS, results are limited; with EMS, your body is finally ready to heal.
For those of you familiar with TENS therapy, it is important to note that EMS is quite different. TENS is designed to primarily stimulate your nerves, so the sensation is more topical. EMS, on the other hand is designed to stimulate your muscles so it is far more deep tissue. Deep tissue therapy is what you need to relieve back pain.
How To Use EMS For Back Pain:
It is best to use EMS while you are at rest (preferably laying down). Lower back pain typically starts with tension in the hamstrings that radiates up to the glutes/ hips, and then the lower back. It is therefore necessary to stimulate the entire region.
Begin by cleaning off your skin and slightly wetting the electrodes and rubbing them together to activate the adhesion. Do this every time after the first use. The pads are typically made of silicon, and the adhesion is water activated. Doing this ensures maximum contact, effectiveness and comfort.
Place the electrodes on each of your hip flexors. Freeing up the tension in your hips will immediately relieve a lot of your back pain. Give yourself a 20-30 minute session.
After doing a session on your hips, move the pads to your lower back placing the electrodes on either side of your spine (never place directly on the spine). Continue to do a session on your back.
After treating your back, move the pads down lower to your glutes and repeat the process.
Intensity: Turn up the intensity until you feel strong but comfortable contractions.
If you feel a little discomfort, that is normal. The muscles are tight which might cause some tenderness at first, but there is no need for alarm. Your body will adapt, and the initial discomfort will subside.
But it is important to turn it up high enough to cause muscle contractions, otherwise it will not be effective.
As you get more comfortable with the sensation, if you feel you can handle more intensity, feel free to turn it up higher
Mode: Choose pulsed or massage setting. Whatever mode feels most comfortable to you
Duration: 20-30 minutes, 1–2 times daily on each muscle group Hips, glutes, and back) for two weeks, then 3–5x weekly for maintenance. EMS however can be used more frequently. Feel free to use it whenever you are having a flare-up (especially sciatica).
The key take-away here is that to get relief, it is important to stimulate the entire region of your hips, glutes, and lower back. It's not just about working the lower back muscles. To get full effectiveness, you have to also work the other muscles in that area.
If you feel a little sore after using EMS the first few times do not be alarmed. It's just part of the process of loosening and conditioning the muscles. If you feel intense pain for any reason (though very rare) cease use and contact your medical professional. Do not use EMS if you have a pacemaker, defibrillator, or are pregnant.
Quick EMS prep routine:
-
EMS for 20 minutes (hips/low back/glutes)
-
2 minutes light walking or marching in place
-
Start stretching routine
Step 2: Daily Stretching Routine for Back Pain (10–15 Minutes)
Goal: Restore mobility, reduce stiffness, and unload your spine.
Do this once daily—ideally after EMS.
Regular stretching is extremely important but often overlooked. Stretching helps keep muscles loose, increases blood flow, decreases the buildup of lactic acids and toxins, and increases mobility.
This is a simple stretching routine you can do daily to relieve tension from your back. Do not worry about doing them all perfectly. Do them to the best of your ability and allow yourself to improve over time.
It is best to do this after an EMS session for maximum effect.
1. Diaphragmatic Breathing – 60s
On your back, inhale into your belly, exhale slowly. Resets tension.
2. Cat–Cow --- 8 reps
On all fours, round (Cat), then arch gently (Cow). Improves spine mobility.
3. Child’s Pose with Side Reach – 30s each side
Sit back on heels, arms forward, walk hands to side. Opens low back and lats.
4. Kneeling Hip-Flexor Stretch – 45s each side
Kneel, tuck pelvis, shift forward, raise same-side arm. Releases tight hip flexors.
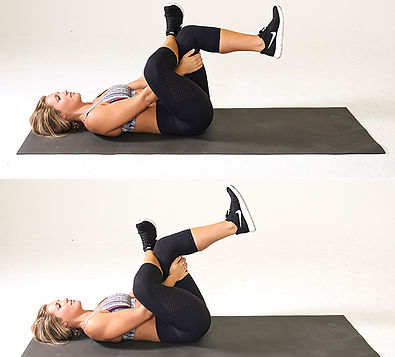
5. Figure-4 Glute Stretch – 45s each side
On your back, ankle over thigh, pull leg in. Relieves glute and piriformis tension.
6. Hamstring Strap Stretch -- 45s each side
On your back, strap around foot, raise leg slightly bent. Loosens hamstrings.
7. Open Book Rotation – 8 reps each side
Lay on your back with your knees up and arms out. Slowly rotate your knees from side to side. Restores mid-back mobility.
8. Deep Squat Hold – 45s
Hold a support, sink into squat, chest tall. Resets hips, ankles, and spine.
Step 3: Strengthening Exercises for Back Pain
(3 Days/Week)
Goal: Build strength in your core, glutes, and hips to keep back pain from coming back.
Strength training is the last step of this 3-step guide. Strength training is not about relieving pain, it's about keeping it away. Its focus is to eradicate the weakness that leads to the tension, which in turn becomes pain.
When it comes to the exercises listed below, do not force yourself to try to do what you don't feel you reasonably can. Only do what you are comfortable with.
Strength Circuit:
1. McGill Curl-Up – (3 sets, 10 reps each set) Core endurance without straining the spine
-- Lie on your back with one leg bent and the other straight.
-- Place your hands under your lower back to maintain its natural curve.
-- Brace your core (as if tightening your stomach).
-- Gently lift your head, shoulders, and upper back just an inch or two off the floor—don’t round your spine.
-- Hold for 2–3 seconds, then slowly lower.
-- Breathe steadily and repeat
2. Side Plank – (3 sets, 20–30s each side) Lateral core and obliques
-- Lie on your side with your elbow directly under your shoulder and legs stacked.
-- Brace your core and lift your hips until your body forms a straight line from head to feet (or knees for an easier version).
-- Hold the position, keeping hips lifted and spine neutral, then slowly lower.
3. Bird Dog – (3 sets, 8 reps each side) Stability and coordination
-- Start on all fours, hands under shoulders and knees under hips.
-- Brace your core and keep your spine neutral.
-- Extend one arm forward and the opposite leg straight back.
-- Hold for 2–3 seconds, keeping your body steady.
-- Return slowly and switch sides.
4. Glute Bridge – (3 sets, 12–15 reps each set) Glute activation to offload the back
-- Lie on your back with knees bent and feet flat on the floor, hip-width apart.
-- Brace your core and press through your heels.
-- Lift your hips until your body forms a straight line from shoulders to knees.
-- Squeeze your glutes at the top for 1–2 seconds.
-- Lower slowly and repeat.
5. Hip Hinge Drill – (3 sets, 10 reps per set) Trains proper hip movement vs. back bending
-- Stand with feet hip-width apart, knees slightly bent.
-- Place your hands on your hips.
-- Push your hips straight back as if reaching for a wall behind you.
-- Keep your back flat and chest tall—don’t round your spine.
-- Move until you feel a stretch in your hamstrings, then drive your hips forward to stand tall.
6. Pallof Press – (3 sets,10 reps each side) Anti-rotation core strength
-- Anchor a resistance band (or cable) at chest height and stand side-on to it.
-- Hold the handle or band at your chest with both hands, feet shoulder-width apart.
-- Brace your core and press your hands straight out in front of you.
-- Hold for 1–2 seconds, resisting the band’s pull, then return slowly to your chest.
-- Repeat, then switch sides.
7. Farmer Carry – (4 sets, 30–45s each set) Posture, grip, and whole-body bracing
-- Stand tall holding a dumbbell or kettlebell in each hand at your sides.
-- Brace your core, pull your shoulders back, and keep your chest tall.
-- Walk forward slowly and steadily for the set distance or time.
-- Set the weights down safely, reset, and repeat.
Sample Weekly Back Pain Relief Schedule
Monday: EMS + Stretching + Strength Routine
Tuesday: EMS + Stretching only (light walk optional)
Wednesday: EMS + Stretching + Strength Routine
Thursday: EMS + Stretching only
Friday: EMS + Stretching + Strength Routine
Saturday: Stretching only (EMS optional if sore)
Sunday: Stretching + light activity (walk, swim, cycle)
Bottom Line: Back Pain Relief That Lasts
Controlling back pain is up to you. You have to make the choice to no longer be a victim of pain and chose to be consistent with your own care. If you do that, you can regain a life not continuously affected by pain.
Back pain won’t go away until you address it in the right order. Start with EMS to reduce pain and release tension; follow with stretching to restore mobility; and finish with strengthening to prevent flare-ups.
As far as getting an EMS device, I recommend visiting Body Solutions at www.body-solutions.net. In over ten years of experience, I will definitely say that their selection is the best and of the highest quality. Their devices are equipped with EMS, TENS, and Microcurrent therapies. You can use the promo code PAIN FREE to receive 50% off at checkout. I do also warn against getting one from Amazon. They typically are not as effective.
The proven formula is simple: EMS → Stretch → Strengthen.
Follow it consistently, and you’ll finally have a back that feels free, strong, and pain-free.
Article by Anthony Fabiyi (EMS Pain Management Specialist)
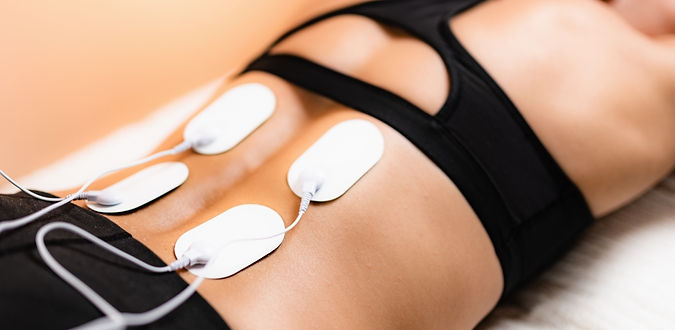
EMS Electrodes On The Back